Getting Started with Claude Code: A Guide for Non-Programmers
There's a lot you can do with Claude or any other Large Language Model (LLM) through their web interface, but if you want to go deeper, Claude Code is the way to get there. With Claude, you don't need to know how to program (but it definitely helps). You do, however, need a Windows machine (or macOS with terminal), some patience, the willingness to type commands into a box rather than click buttons (using Linux or macOS terminal), and at least the Pro account, but at $20/month, it's a steal. The payoff: you build real things iteratively - describe what you want, review what you get, refine. It's worth the setup.
This guide is for the person who is curious about AI-assisted development but doesn't have a programming background.2 Maybe you've seen demos of Claude building things and thought "Hey, I want to try that!" Maybe you have an idea for a project and you're tired of waiting for someone else to build it. Maybe you just want to understand what people are actually doing when they say they "vibe code with Claude."
I've been writing code and managing systems for 30 years. I know what it feels like to sit in front of a terminal for the first time and have no idea what any of it means. There's a blinking cursor, no buttons to click, and a sinking feeling that you might destroy your computer. Don't worry, you won't!
Getting a Terminal
Claude Code runs natively on Linux and macOS. On Windows, you need WSL to get a Linux environment. On macOS, you already have one.
Windows: WSL + Ubuntu
WSL stands for Windows Subsystem for Linux. Linux is an open-source operating system - the same one that runs most of the internet, the majority of cloud servers, and Android phones. It's what most developers work on. It is not Windows. WSL puts a real Linux environment inside Windows - not an emulator, not a virtual machine, a native layer Microsoft built into the OS.3 Your Windows files stay exactly where they are. Linux sits alongside them, and the two can talk to each other.
What you're installing alongside WSL is a Linux distribution (distro) - a packaged version of Linux. The core underneath is the same across all of them; what changes is what software comes pre-installed, how updates work, and what tools are available by default. There are dozens of distros. You don't need to care about most of them.
For getting started: Ubuntu 24.04 LTS.
Why Ubuntu: it has the largest community of any Linux distro. When something breaks, there's a Stack Overflow answer for it. When you search "how to install X on Linux," the example is almost always Ubuntu. LTS (Long Term Support) means it gets security updates for five years and won't randomly change on you.
Opening PowerShell
(This section is a good example of iterative development in action. My first pass just said "open PowerShell and run the command" - jd pushed back and asked me to be more explicit for a non-technical audience. One prompt, better output. That's the whole game.)
Press the Windows key, type PowerShell, and right-click on Windows PowerShell in the results. Click Run as administrator. Click Yes when Windows asks for permission.
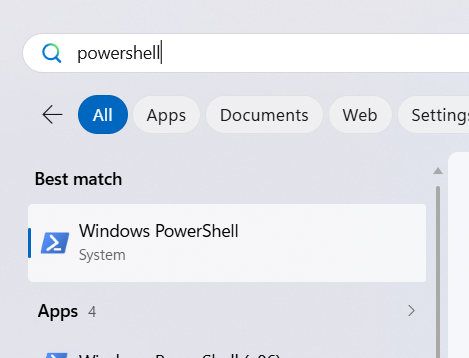
You'll see a blue terminal window. Run this in it:
wsl --install -d Ubuntu-24.04
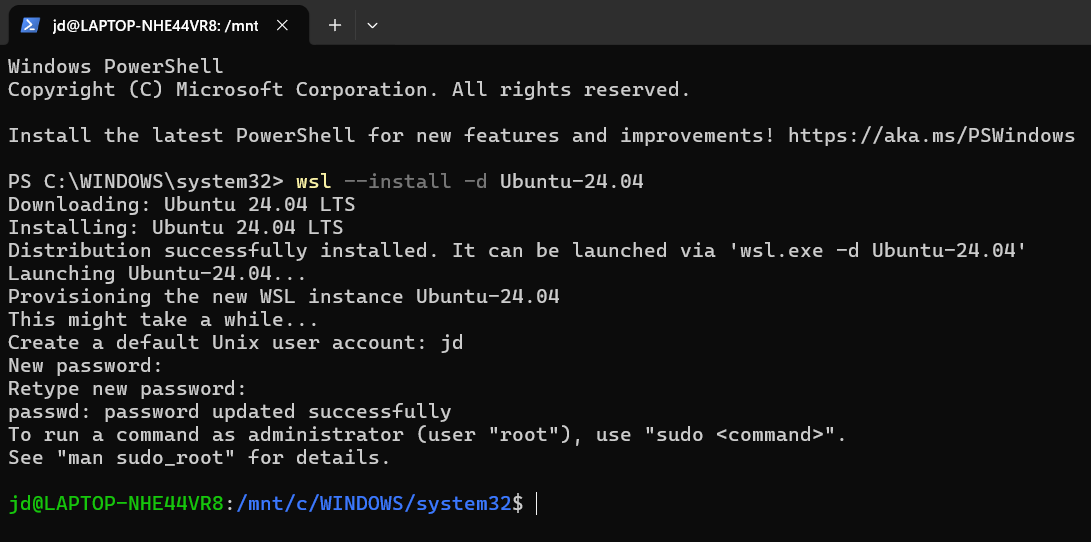
This downloads and installs both WSL and Ubuntu. It takes a few minutes. When it's done, it will ask you to create a username and password.
Note: Some machines require a reboot partway through. If Windows prompts you to restart, do it. After rebooting, open PowerShell as administrator again and run the same command - it will pick up where it left off and finish the install.
Troubleshooting: "network resource unavailable" error
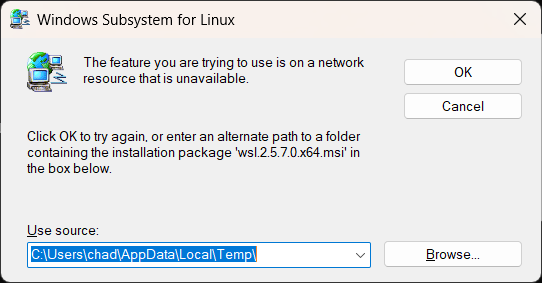
If you open WSL from the Start menu after the install and get a dialog saying the feature is on a network resource that is unavailable, the installer didn't finish cleanly. Go back to your administrator PowerShell window and run:
wsl --upgrade
Keep the username short, lowercase, no spaces. Use a strong password you'll remember - or store it in a password manager like KeePass.
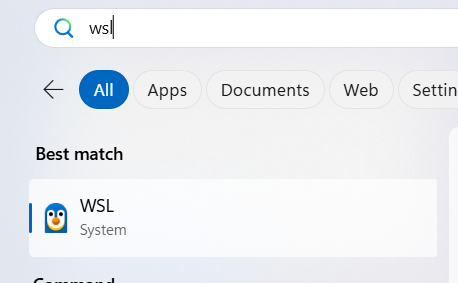
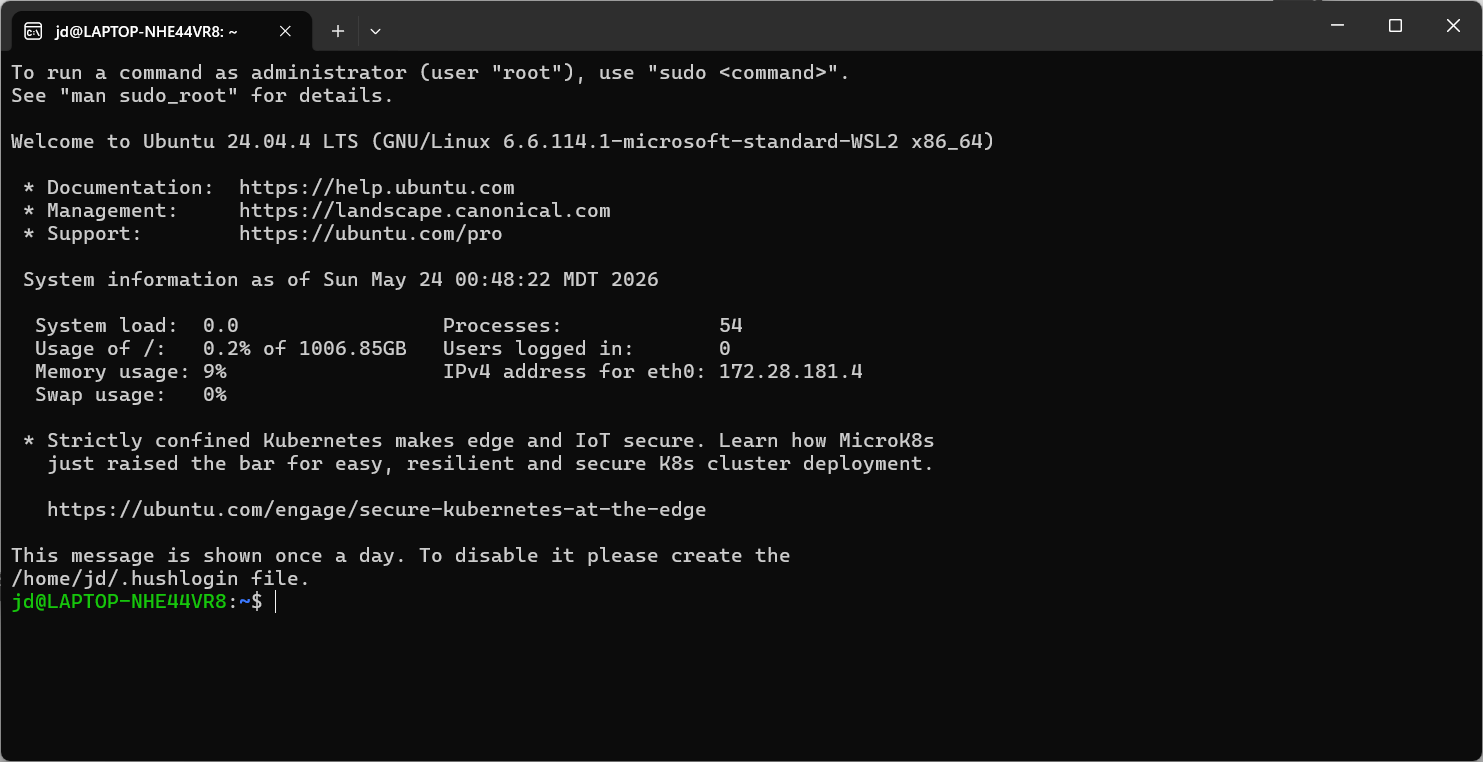
From now on, you get into Linux by going to Start -> WSL. Once you see a prompt that looks like yourname@YOURPC:~$, you're in Linux.
If you want to explore later: Debian is the lean alternative - fewer pre-installed packages, rock-solid stability. For your first time through, stick with Ubuntu.
macOS: Terminal
macOS is built on Unix, which means you already have a terminal and all the tools you need. Nothing to install.
Press Cmd+Space to open Spotlight, type Terminal, and hit Enter.
You'll see a window with a prompt that looks like yourname@Macbook ~ %. That's your terminal. Every command in this guide works here exactly as written.
Now that you're at a command line, it would be helpful for you to know a handful of commands to move around in Linux (or macOS). Since Linux is a Unix-like operating system, and macOS is based on BSD, the commands are going to work for both1. I had Claude whip up (and format in a nice table) a bunch of basic commands for navigating around. You might not need to use these, but they're helpful to know anyway. Think of them like DOS commands from back in the old days of computers.
For the Windows users, you might get tripped up on no drive letters, and everything lives under /. If you want to get to your C:\ drive:
cd /mnt/c
To get to your desktop:
cd /mnt/c/Users/yourname/Desktop/
A mounted drive would be:
/mnt/d
You probably guessed that /mnt means "mount", which is what happens even in Windows to a drive so you can access it. Another note - capitalization matters (Documents and documents are different folders). The mental model shift that makes it click: Linux treats everything - files, devices, network connections - as a file in a tree. Once you understand that, things get easier.
Linux Basics
Two things to know before you touch anything. First, paths in Linux use forward slashes, not backslashes. C:\Users\you becomes /home/you. Second, ~ is shorthand for your home directory - wherever you are, cd ~ gets you back to your starting point.
These are the commands that cover 90% of what you'll need. All commands run in your terminal - Ubuntu on Windows, Terminal on macOS.
pwdlsls -lacd foldernamecd ..cd ~mkdir foldernamecp file.txt copy.txtmv oldname.txt newname.txtrm filename.txtcat filename.txtnano filename.txtsudo somecommandsudo apt install packagenameexitA few notes: when sudo asks for your password, nothing will appear on screen while you type - that's normal, just hit Enter when done. In nano, Ctrl+O saves and Ctrl+X exits.
Installing Claude Code
Claude Code requires Node.js, and it requires a recent version. The package Ubuntu ships with apt is years out of date and will cause problems. Install nvm first, then use it to install Node.
1. Install nvm (Node Version Manager)
In your terminal:4
curl -o- https://raw.githubusercontent.com/nvm-sh/nvm/v0.40.4/install.sh | bash
The version above may be out of date by the time you read this. Check the latest:
curl -s https://api.github.com/repos/nvm-sh/nvm/releases/latest | grep '"tag_name"' | cut -d'"' -f4
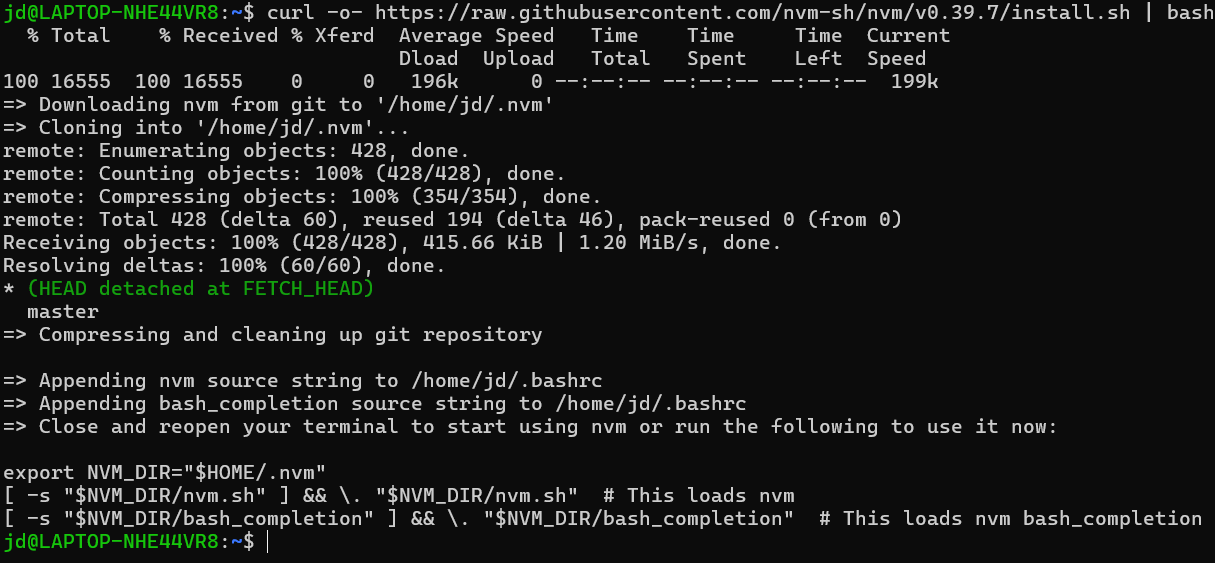
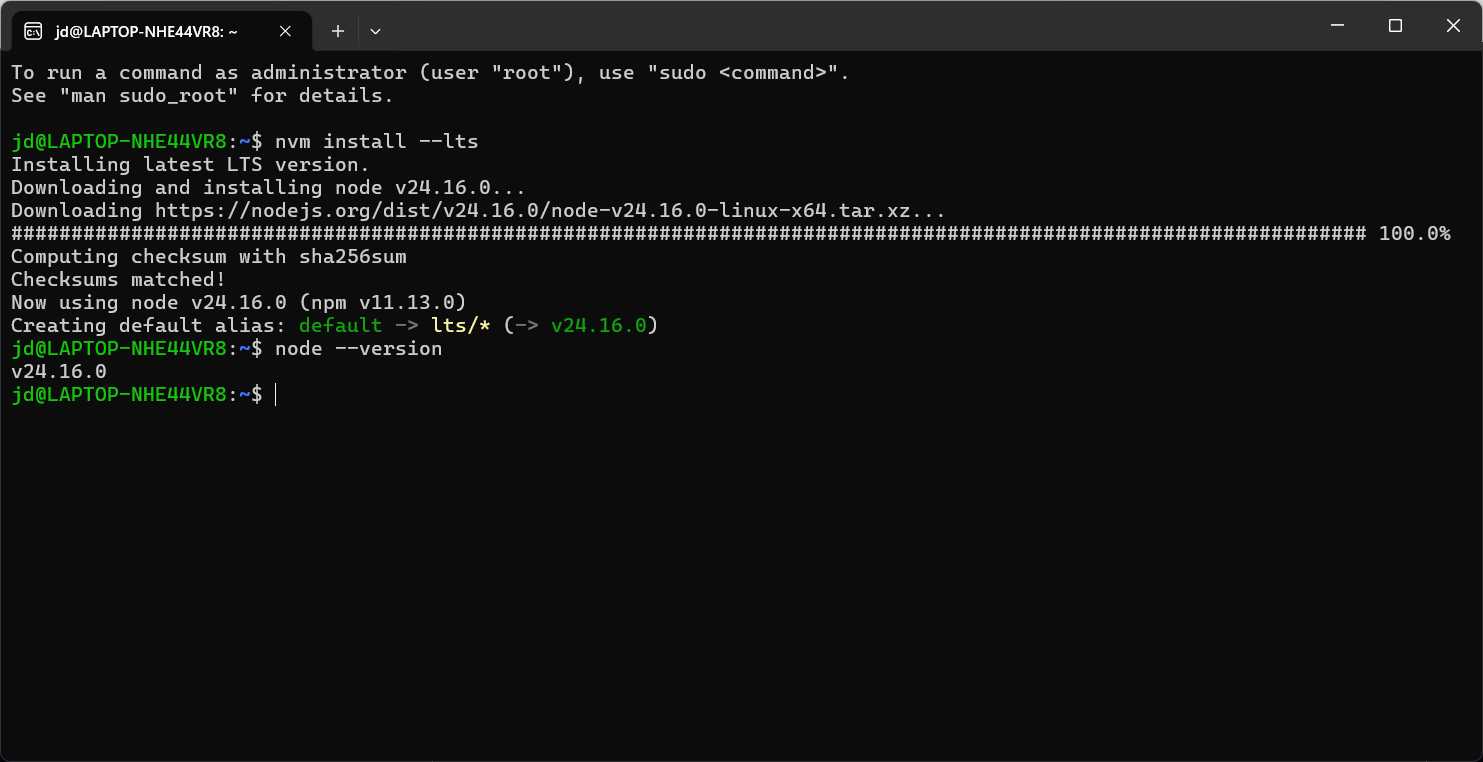
Close your terminal completely and open a new one. (Windows users: that's Start -> WSL.) Then install the current LTS release:
nvm install --lts
Verify it worked:
node --version
You should see something like v22.x.x. If you see command not found, close and reopen your terminal again.
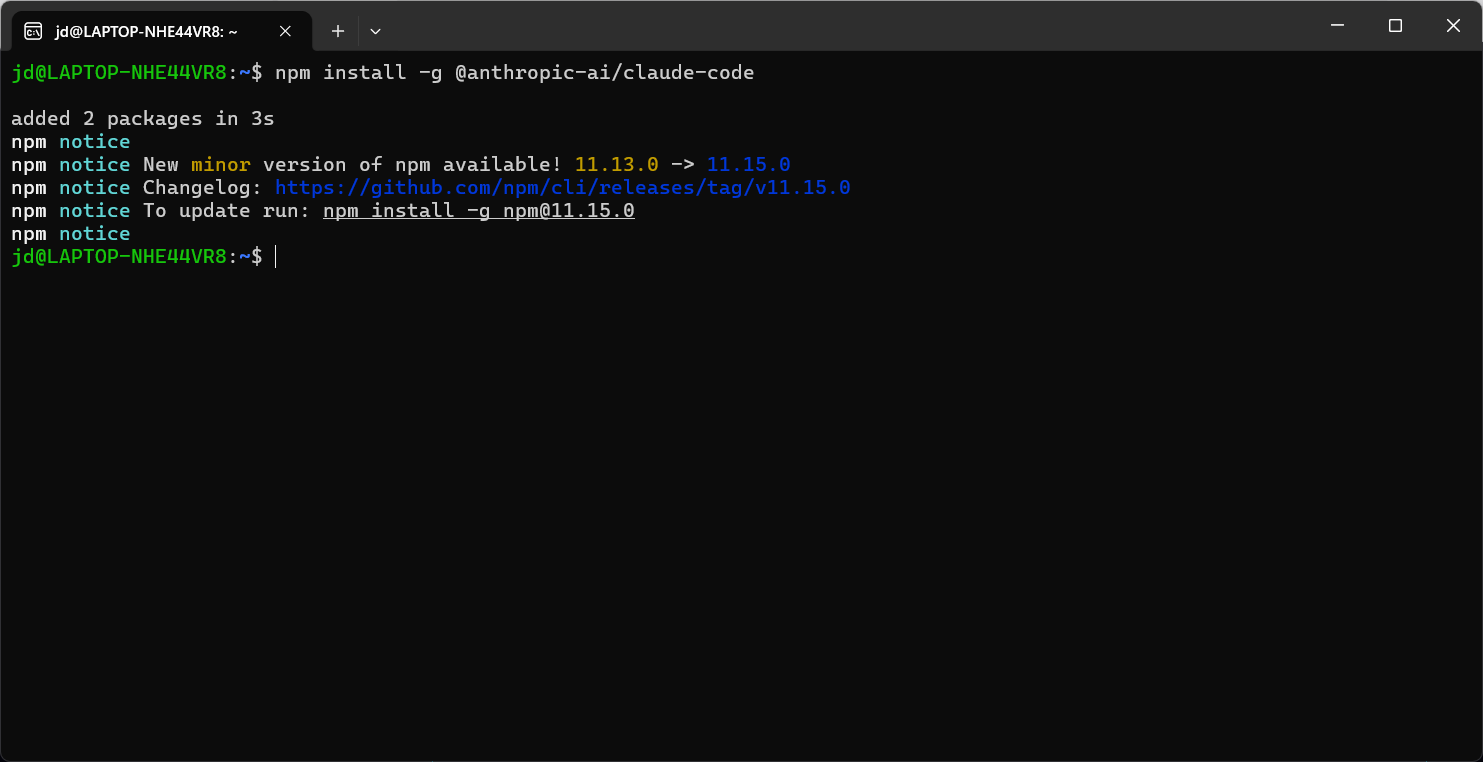
2. Install Claude Code
npm install -g @anthropic-ai/claude-code
3. Launch Claude Code
claude
The first time you run it, Claude Code opens a browser window and asks you to log in with your Anthropic account. Use the same account as your Claude Pro subscription. After authenticating, return to the terminal - you'll see a welcome prompt and a > cursor. Type your first request, or type /help to see available commands.
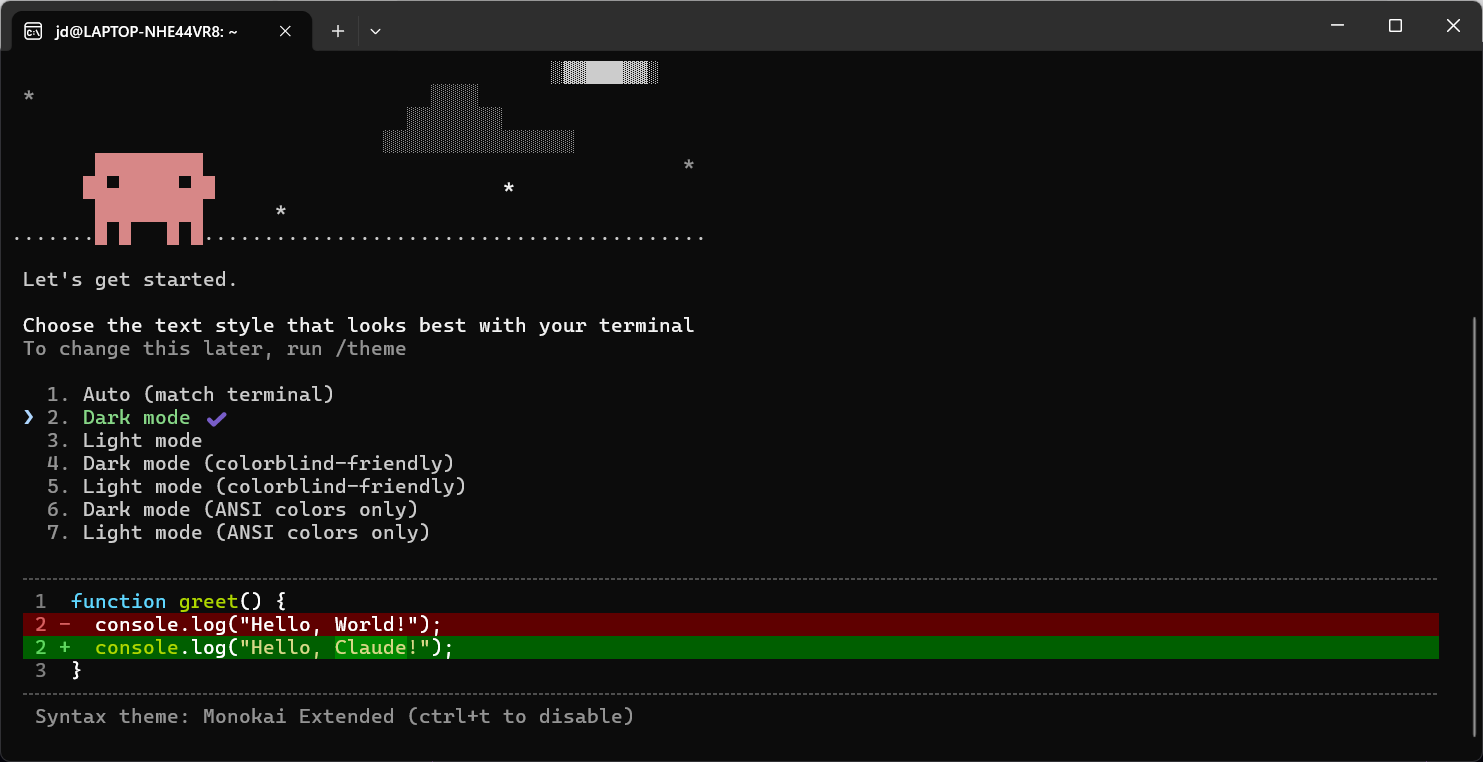

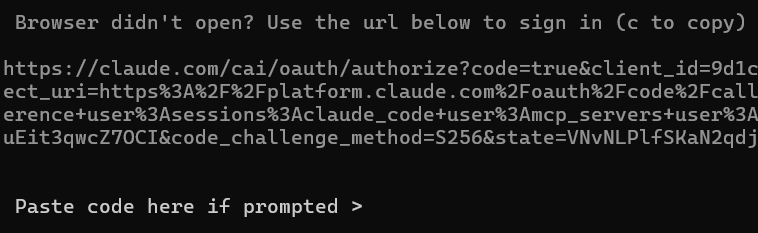
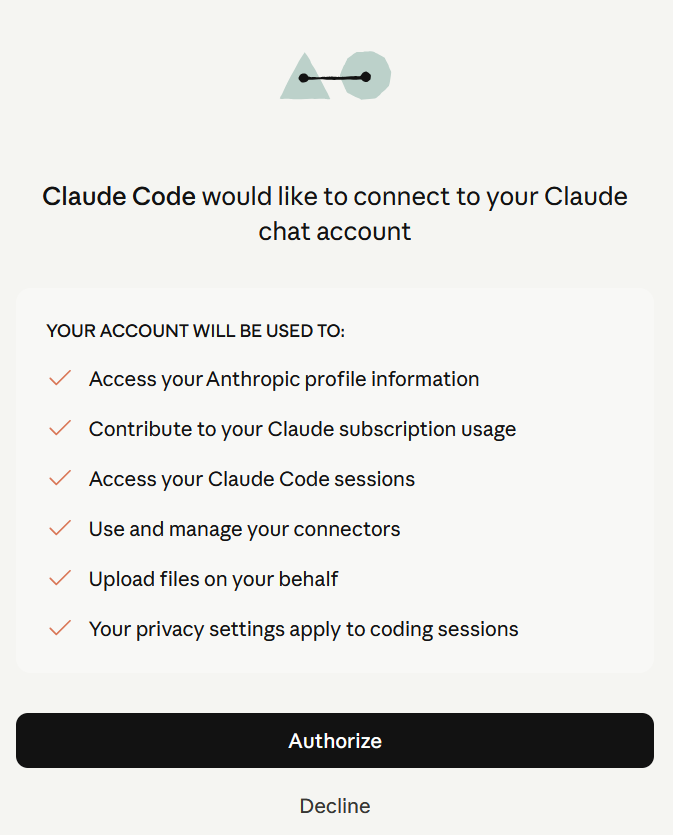
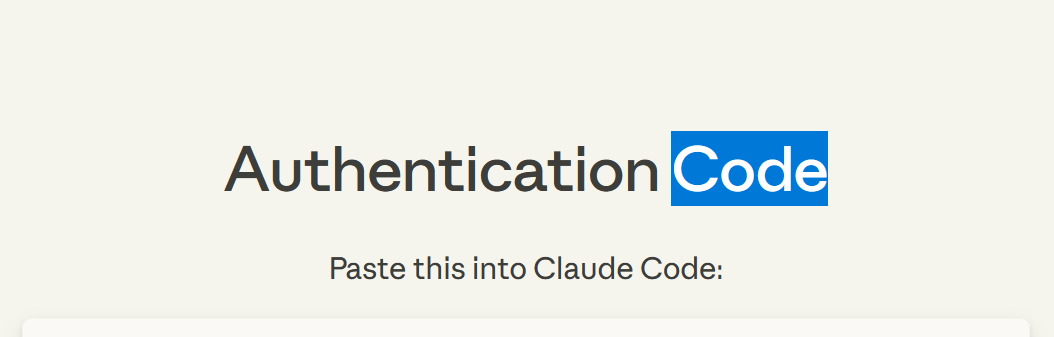
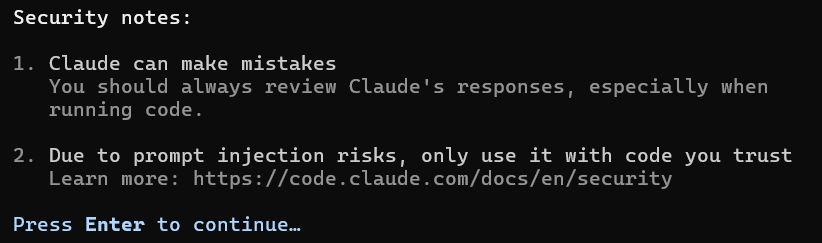
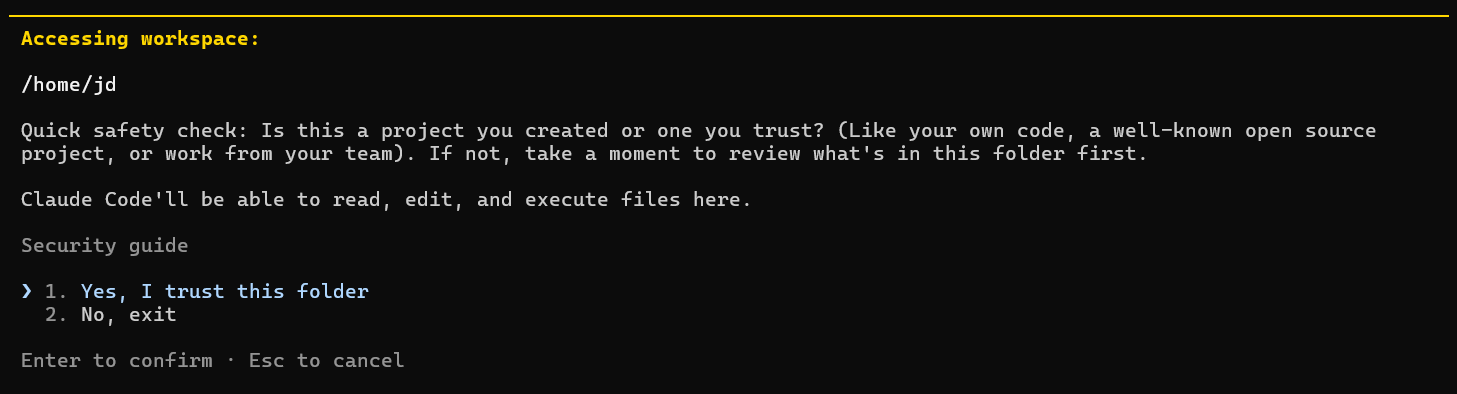
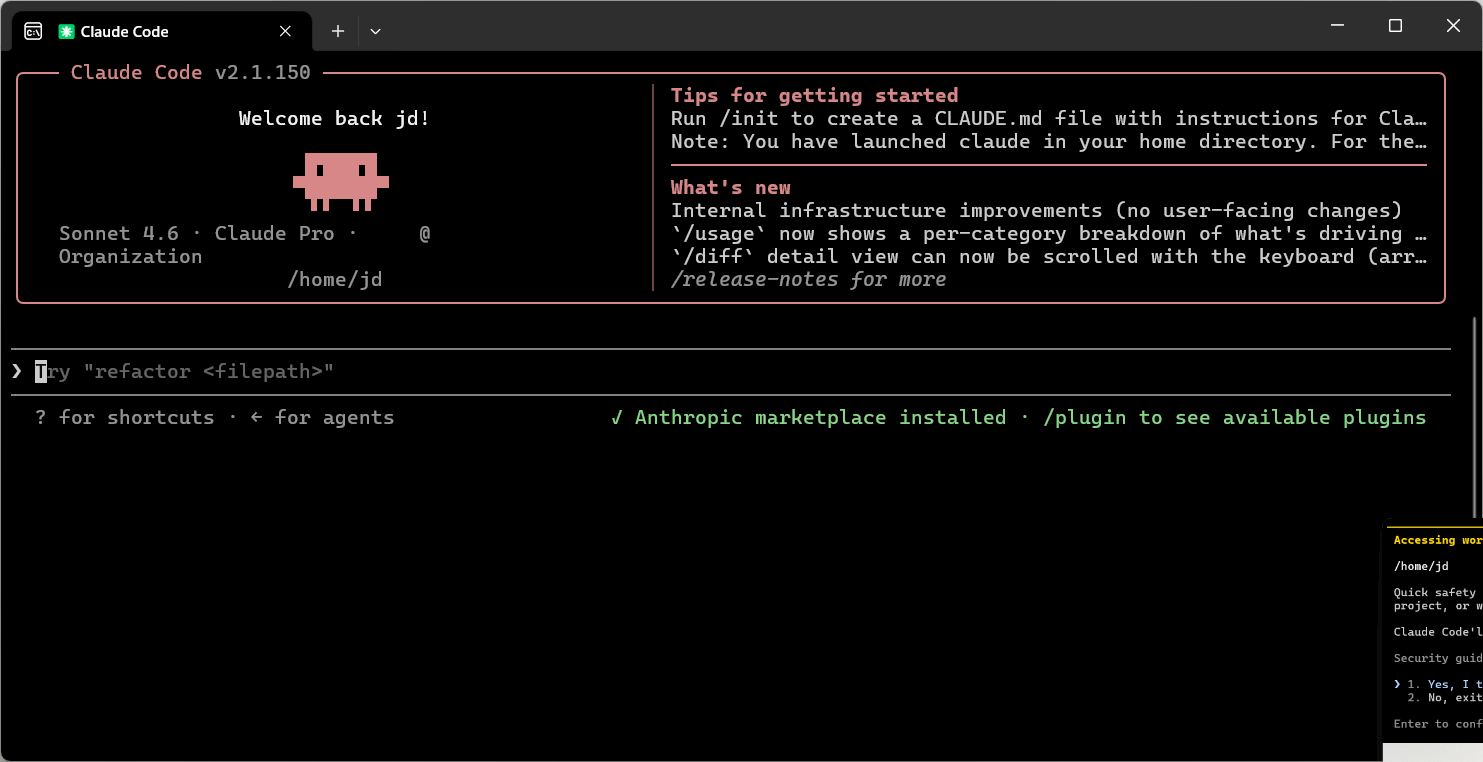
When you're done with a session, type /exit or /quit to close Claude Code and return to your terminal.
The most common trip-up is Node. If you skip the nvm step and try sudo apt install nodejs, you'll get a version that's potentially years out of date. Claude Code will fail to install or behave strangely. Use nvm. Every time. This is not optional.
The Pro plan is $20/month on claude.ai - that same subscription covers Claude Code. Not a separate account, not extra billing. When you run claude for the first time it opens a browser, you log in with your Anthropic account, and you're in. There's a Max plan at $100/month if you end up doing heavy development and hitting usage limits, but Pro is the right place to start. There's also an API-based plan for more specific usage - handy if you're a developer, or if you hit your Pro limits mid-session and want to keep going without waiting for the reset.
The first time you run claude, a browser opens for auth, then you're back at a terminal prompt. Give it a try. Ask Claude some questions like you would in the web console. Ask it to validate your new business idea without glazing you. Ask for a top 10 list of popular music to try. What's that, you hate Taylor Swift? Maybe you need to customize it...
Memory Files and Organization
What is Markdown?
Markdown is a lightweight formatting language. It is plain text with a small set of symbols that control how the text looks when it is rendered. A # at the start of a line makes it a heading. **bold** makes text bold. A hyphen at the start of a line makes a bullet point. That's most of it.
A .md file is a text file that uses Markdown formatting. You can open one in any text editor - Notepad, VS Code, nano. The .md extension tells programs like GitHub, or a blog platform, to render it with formatting rather than showing raw text. You do not need to memorize Markdown syntax. Claude knows it and can write or edit these files for you. What matters is understanding what they are for.
CLAUDE.md - Briefing Claude Before You Start
CLAUDE.md is a plain text file that Claude Code reads automatically when it starts. It is a briefing document - you put in it everything you would otherwise have to explain at the start of every session.
There are two levels:
Global: ~/.claude/CLAUDE.md - loaded in every session, regardless of which project you are in. This is where your preferences live: communication style, technical background, things Claude should never do, how you want responses formatted.
Project-level: a CLAUDE.md inside your project folder, sitting alongside your code. Loaded only when you start Claude from that directory. Project-specific context goes here: what the project does, how it is structured, how to run it, what a new contributor would need to know.
Running /init to Generate CLAUDE.md
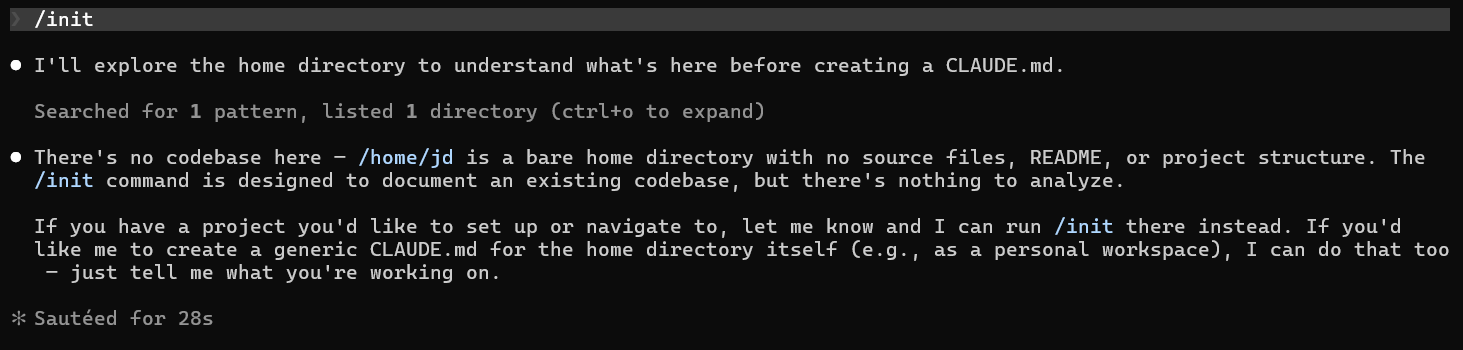
If you are starting in an existing project, run this inside a Claude Code session:
/init
Claude will read the files in your current directory - package.json, README, existing code, configuration files - and generate a CLAUDE.md describing the project. It is a starting point, not a finished product. Read what it generates, remove anything wrong or irrelevant, and add what it missed.
Setting up your CLAUDE.md is highly recommended. It lets Claude know your communication style, your family, your work context, your projects - none of which you have to re-establish at the start of every session. It's the difference between a new contractor who's never met you and one who's read your entire project history before walking in the door.
I don't use a CLAUDE.md in every project folder. What I have is a master .md file per project, with my contexts organized in ~/.claude/contexts/. My global CLAUDE.md references those files in a table:
| File | When to load |
|---|---|
~/.claude/contexts/home/homeassistant.md | Working on Home Assistant config or Pi |
~/.claude/contexts/home/alexa-migration.md | Migrating Alexa devices/automations to HA |
~/.claude/contexts/home/school-calendar.md | Checking school emails or calendar events |
When I want to load a context, I just tell Claude to read it. That's it.
My projects and writing live under my home directory (/home/jd/projects, /home/jd/writings). Each master context file references those folders for the relevant project. Here's a real example from my blog research context:
contexts/website/blog-research-workflow.md:
  Working files: /home/jd/writing/[post-slug]/, research files + blog-post-master.md
I don't manage the actual .md files directly. I just manage how things are organized. Claude handles the rest.
The ~/.claude/ Directory Structure
Over time, ~/.claude/ becomes your Claude configuration home. A real setup looks something like this:
~/.claude/
  CLAUDE.md                  ← global instructions, loaded every session
  contexts/
    finance/                 ← detailed docs loaded when working on budgets or investments
    home/                    ← smart home, Home Assistant, devices
    music/                   ← music library, studio gear
    personal/                ← family, calendar, contacts
    tech/                    ← active technical projects
    website/                 ← blog and consulting site context
    work/                    ← professional background, tools, stack
  projects/
    -home-jd/
      memory/
        MEMORY.md            ← index of auto-saved memories
        feedback_*.md        ← corrections and confirmed approaches
        project_*.md         ← ongoing project context
        user_*.md            ← user preferences and profile
Context files under contexts/ are detailed reference documents you load on demand. You tell Claude to read one at the start of a session when the task calls for it. They are too detailed to load every time.
The memory/ directory is where Claude's auto-memory system stores things it learns across sessions: corrections you made, approaches that worked, project state. The MEMORY.md file is an index - it loads automatically and points Claude to the relevant memory file when needed.
What Anthropic Recommends
Anthropic's guidance on CLAUDE.md: keep it focused. A few practical points.
The file is loaded into context at the start of every session. A very long CLAUDE.md eats into the budget Claude has available for actual work. Include things Claude genuinely needs to know upfront - not everything you have ever told it.
Separate concerns into separate files. Your global CLAUDE.md should cover you as a person and your general preferences. Project-specific details belong in the project's own CLAUDE.md. Deep reference material belongs in context files you load on demand.
Do not duplicate things the code already makes obvious. If your project has a clear README, Claude can read that. CLAUDE.md is for things that are not in the code.
Review it periodically. Preferences change, projects evolve. Instructions written six months ago may be stale or actively wrong.
Backing Up Your Claude Files
Your CLAUDE.md files, context documents, and memory entries represent real accumulated work. They live in ~/.claude/. A private GitHub repository is the right place to back them up, versioned, free, and accessible from any machine.
Git is a tool that tracks changes to files over time. Think of it like a save history: every time you "commit," you are taking a snapshot of your files at that exact moment. GitHub is a website that stores those snapshots in the cloud so you can access them from any computer and recover them if something goes wrong. When you "push," you are uploading your local snapshots to GitHub.
What to Back Up and What to Skip
Some files in ~/.claude/ should never be committed to any repository:
- ⚠️
.credentials.json- this file contains your API key. Committing it would expose your key to anyone who can read the repo, even a private one. cache/,debug/,file-history/,backups/- auto-generated by Claude Code. No value in version control.
Everything else is worth keeping: CLAUDE.md, the contexts/ directory, and the projects/.../memory/ directory.
Create a Private GitHub Repository
If you don't have a GitHub account, go to github.com and create one - it is free.
Once logged in:
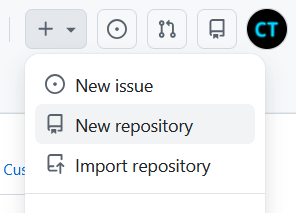
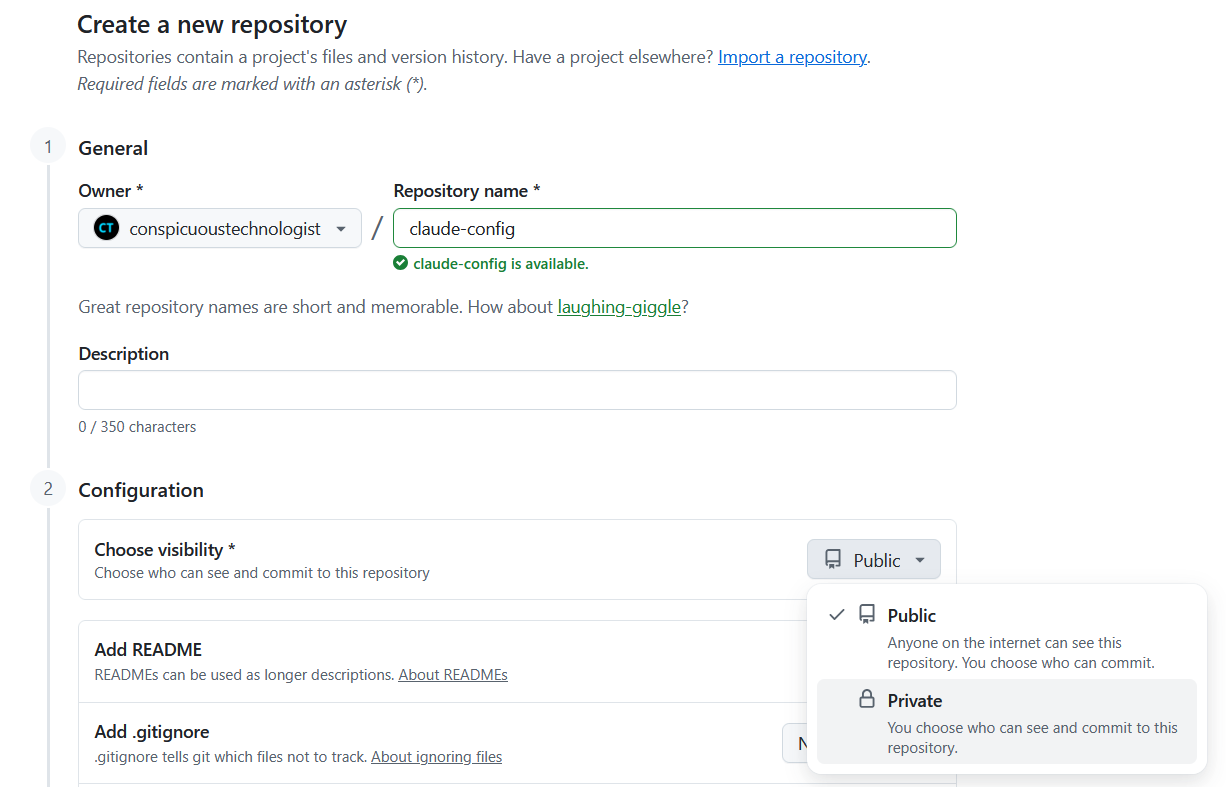
- Click the + icon in the top-right corner and select New repository
- Name it something like
claude-config - Set visibility to Private
- Click Create repository
GitHub will show you a setup page. Copy the HTTPS URL and add your username before github.com - it should look like this:
https://YOUR_USERNAME@github.com/YOUR_USERNAME/claude-config.git

Including your username in the URL means git will always use the right credentials, even if you have multiple GitHub accounts.
When git asks for your GitHub username and password, the password field does not accept your GitHub account password. GitHub requires a Personal Access Token (PAT) for git operations over HTTPS.
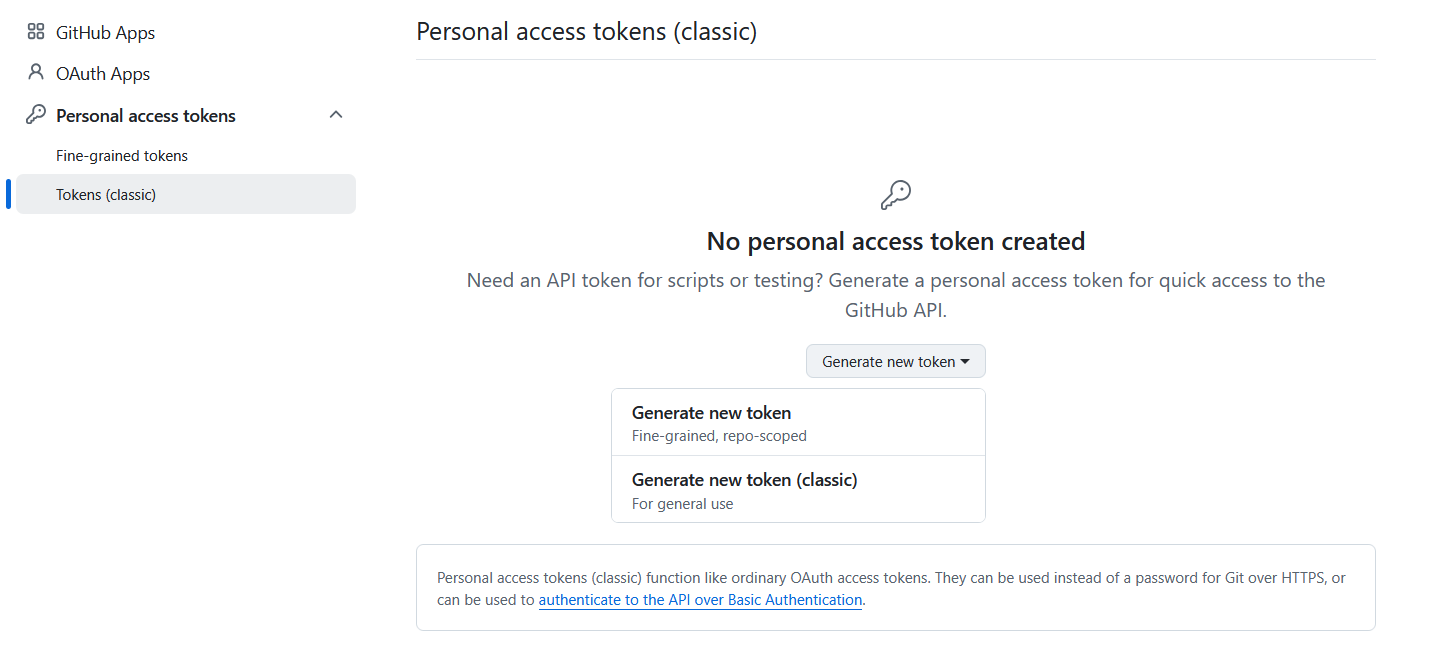
To generate one: go to github.com > click your profile picture > Settings > Developer settings. That opens a new page. Click Personal access tokens, then Fine-grained tokens, then Generate new token.5
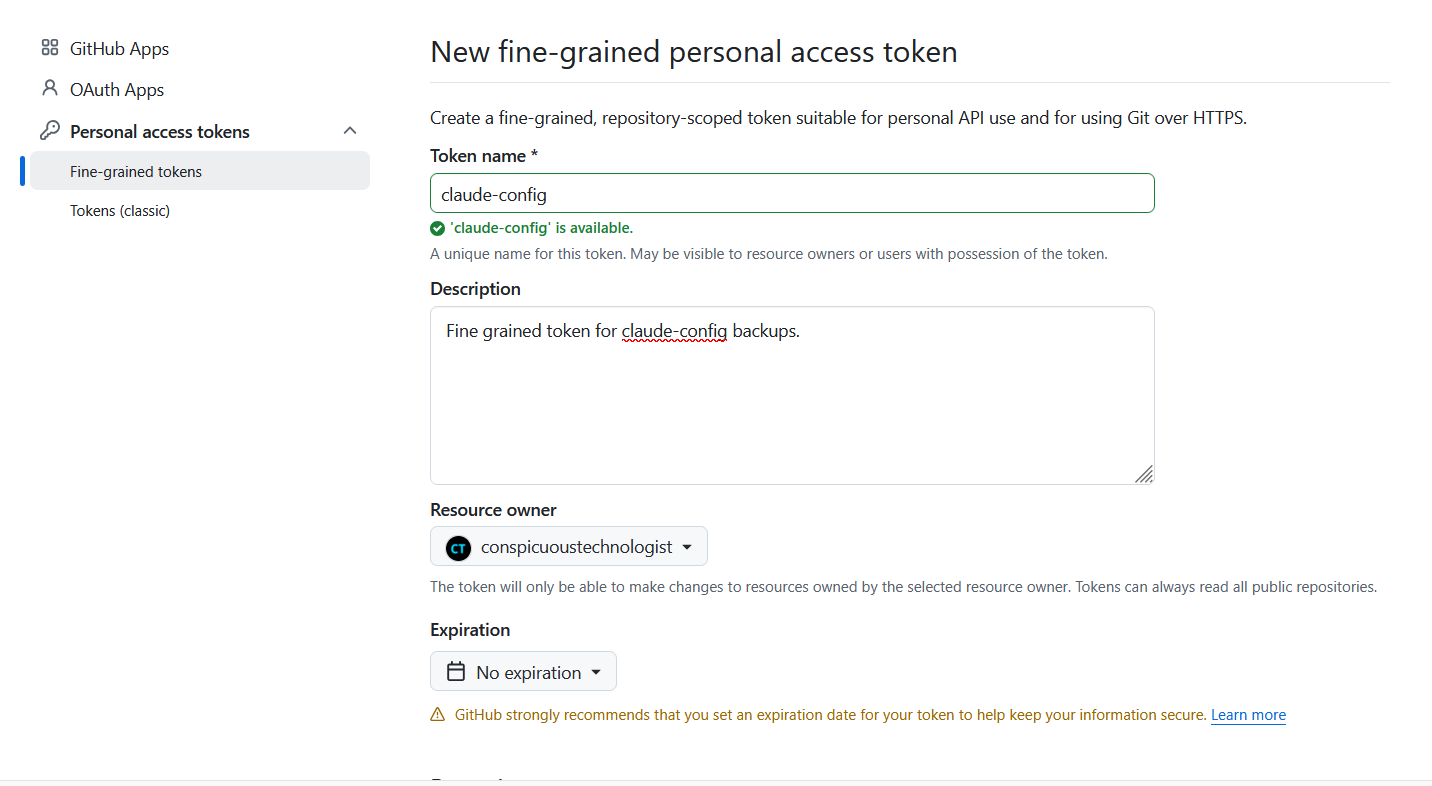
Give it a name and set Expiration to No expiration if you don't want to repeat this setup.
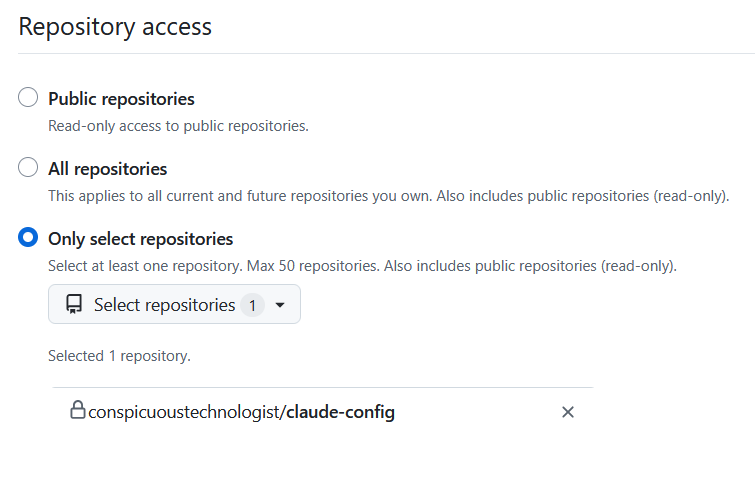
Set Repository access to Only select repositories and choose your claude-config repo.
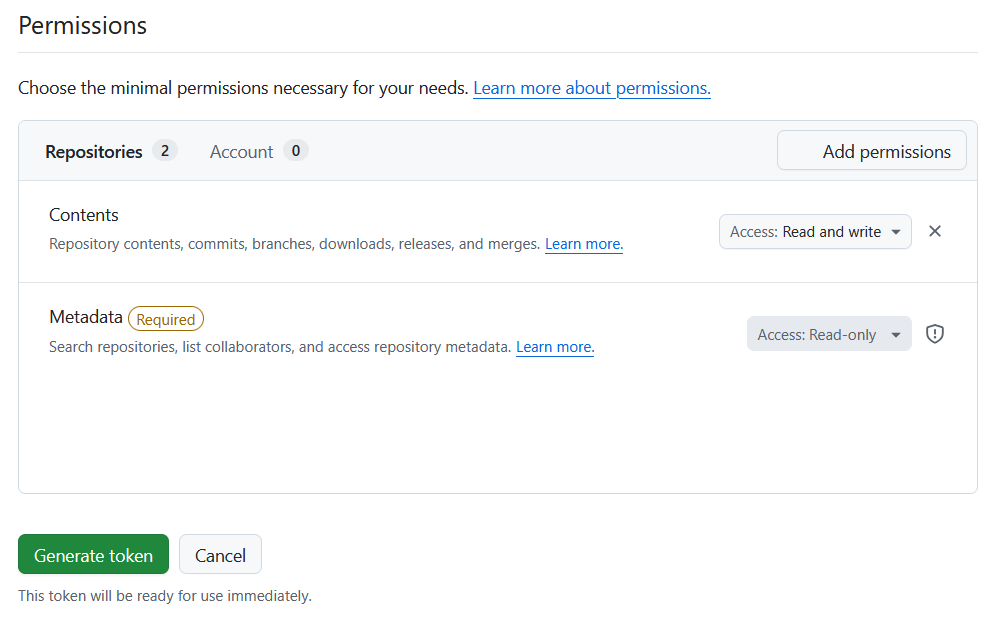
Under Permissions click Add permissions, select Contents, and set the Access dropdown to Read and write. Click Generate token. Copy the token and paste it when git prompts for your password.
Initialize Git and Push
In your terminal:
cd ~/.claude
git init
Create a .gitignore to exclude sensitive and generated files:
cat > ~/.claude/.gitignore << 'EOF'
.credentials.json
cache/
debug/
file-history/
backups/
EOF
.credentials.json warning is not boilerplate. That file is your API key. If it ends up in a public repository, bots will find it within minutes, run up charges on your account, and Anthropic will revoke it. Private repositories are not foolproof either - GitHub has had breaches, tokens get leaked. The .gitignore step is not optional.Before you can commit anything, git needs to know who you are. Run these once to set it up globally:
git config --global user.email "you@example.com"
git config --global user.name "Your Name"
Use the email address you signed up to GitHub with, and your name as you want it to appear. Git attaches this to every commit you make. You only have to do this once per machine.
Add everything, commit, and push:
git add .
git commit -m "Initial Claude config backup"
git remote add origin https://YOUR_USERNAME@github.com/YOUR_USERNAME/claude-config.git
git branch -M main
git push -u origin main
Stop the Password Prompts
Every time you run git push, git asks for your username and password. That gets old fast. The GitHub CLI (gh) can handle credentials automatically so you never see that prompt again.
Install it:
sudo apt install gh
Log in:
gh auth login
Choose GitHub.com, then HTTPS, then Login with a web browser. It will print a one-time code and open a browser window. Paste the code, click Authorize, and you are done.
Now tell git to use gh for credentials:
gh auth setup-git
That's it. From this point on, git push uses your stored token without prompting.
Keeping It Updated
These examples use ~/.zshrc. If you are still on bash, use ~/.bashrc instead. If you want to switch to zsh (it's worth it), install it with:
sudo apt-get install zsh
chsh -s $(which zsh)
Then log out and back in. Zsh will be your default shell.
After editing your context files or CLAUDE.md, push the changes with:
gh auth switch --user YOUR_GITHUB_USERNAME &>/dev/null; cd ~/.claude && git add -A && git commit -m "Update config" && git push
Add a shell function to make that one command:
cat >> ~/.zshrc << 'EOF'
claude-backup() { (gh auth switch --user YOUR_GITHUB_USERNAME &>/dev/null; cd ~/.claude && git add -A && git commit -m "Update config"; git push) }
EOF
source ~/.zshrc
The git push at the end works without prompting because of the gh auth setup-git step above. That wired gh into git as a credential helper, so the stored token is used automatically.
The gh auth switch line ensures the right GitHub account is active before pushing. If you use gh with multiple accounts, or if you use it for other things like blog repos, the active account may not be the one that owns claude-config. The &>/dev/null suppresses output so it is silent when the right account is already active.
If you only have one GitHub account, you can drop that line entirely.
Run claude-backup any time you make changes worth keeping.
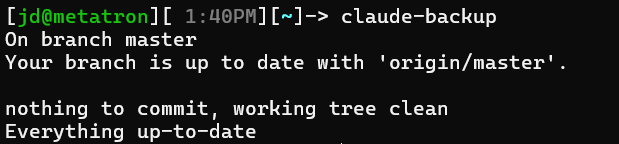
The private repo is also non-negotiable for a different reason: your context files contain real personal information. Financial context, family details, work stack, project specifics. None of that belongs in a public repository.
The habit that works: push after any session where you changed something. Not weekly, not "when I remember." After the session. It takes ten seconds with the alias.
Giving Claude Your Voice
The default Claude is competent but generic. It does not know your communication style, your technical vocabulary, what you already understand, or what you never want explained again. Context files fix that.
Context Files
A context file is a Markdown document in ~/.claude/contexts/ that describes a specific domain of your life or work in detail. You load it at the start of a session when it is relevant:
read ~/.claude/contexts/work/index.md
Claude reads the file and uses it for the rest of the session. Nothing else required.
A voice or profile context file captures how you communicate and what you want Claude to know about you as a collaborator:
- Your technical background - what you know cold versus what still needs explaining
- Communication preferences - short answers or full explanations, formal or casual
- Things you never want Claude to do - excessive caveats, restating what you just said, starting every response with "Certainly!"
- Domain vocabulary you use that has specific meaning in your context
- Preferred formats for code, commands, and output
The more specific and behavioral the instructions, the better they work. "Be concise" is vague. "One sentence per update, no trailing summaries" is something Claude can actually follow.
Feedback Memory
As you work with Claude, it gets things wrong. It over-explains something you know cold. It uses a format you dislike. It makes an assumption that does not apply to your situation.
When you correct it, Claude Code can save that correction as a memory - a small file in the memory directory that it reads in future sessions. Tell Claude explicitly to remember it - "remember this" is enough, but you can also scope it: "remember this when we write blog posts" or "remember this when we discuss music." Over time, corrections stack up. Claude stops repeating the same mistakes. The feedback_*.md files in the memory directory are exactly that: a record of adjustments that persist across sessions.
You can also save confirmations - things Claude did that worked well, approaches you want repeated. The memory system handles both.
Building a Voice Profile
The practical way to start:
- Open a Claude Code session and talk. Tell Claude about your background, how you work, what you hate about how AI assistants communicate, what tools you use, what you are trying to build.
- At the end of the session, ask Claude to write a context file summarizing what it learned about you.
- Read it. Edit anything wrong. Add anything it missed.
- Save it to
~/.claude/contexts/personal/index.mdor wherever fits your structure. - Load it at the start of future sessions:
read ~/.claude/contexts/personal/index.md.
The first version will be rough. Refine it across a few sessions. After a few rounds of corrections and additions, Claude will have a profile that reflects how you actually work - and sessions will stop feeling like you are training a new hire every time you open the terminal.
My Personalization
The global CLAUDE.md I bring into every session covers the basics about me: 30 years in tech, DevOps/SRE, AWS/Kubernetes/Terraform/DataDog, music and movie preferences, hobbies, etc. The communication rules are in there too - things like: "Be objective when giving feedback. When I'm wrong, tell me immediately and explain why. When my ideas are inefficient or flawed, point out better alternatives. Make responses quick and clear, concise. Do not give me pages of text, unless the solution is complicated and has many steps. In that situation, warn me, and then ask me if I want it all at once or if I want step by step where you give me the next step until I am ready." My family profiles are in there too. Not because Claude needs to know I have a German Shepherd, but because when I ask for help planning a weekend or writing a school email, the context is already there without me explaining it.
Then there are the context files like discussed earlier. I have separate docs for finance, home automation, music (library and studio), active tech projects, and the sites I run. None load automatically - Claude pulls in whatever's relevant at the start of a session. Working on a blog post? Load the voice profile and site context. Checking investments? Load the finance doc. Home Assistant acting up? Load the HA context. This keeps the global CLAUDE.md lean and the per-session context sharp. It saves some tokens and context, too.
The memory folder is where it gets interesting. Every time I correct Claude or confirm something that worked, it saves a note. I have feedback files covering how to write for this site (no em dashes, ever - I had to correct that one more than once before it stuck, and to avoid using the word "vibe"), how to format footnotes, even specific workflows for research articles or Gmail searches. These are not preferences I re-explain every session - they are corrections that persist. They're the equivalent of the README.md files in a code repository.
Iterative Development with Claude
Iterative development is not a programming concept. It is a workflow. You describe what you want. Claude builds a version. You look at it, tell Claude what is wrong or what to add, and repeat. You do not need to write code. You need to be able to describe what you want clearly and evaluate what you get.
The basic workflow: cd to your project folder, run claude, describe the task, let it work, review the output, continue. One thing to understand - Claude sees what is in the folder you started from. That is your working directory. Keep your project files together in one place.
Let's give an example of how you can do this for a website. This assumes you have your prerequisites completed (like having a Dreamhost account - see the Bootstrapping this site page). Have Claude create whatever the basic structure is for your framework and start giving it some commands.
- Build me a website with a top left navigation. It should have Home, Services, and About pages. I want it to be white and blue and green.
- Claude builds the initial site structure and pages.
- I don't like those colors. I have an old logo at
C:\Documents\supercoollogo_biz.jpg. Use those colors.
- Claude extracts a palette from the logo and applies it.
- Shoot, I forgot I wanted a "Rates" page. And a Portfolio! Update the menu and add them.
- Claude adds both pages and updates the navigation.
- Uh, the order is wrong. I want it to be Home, Services, Rates, Portfolio, About.
- Claude reorders the navigation.
- Add a footer with my contact information found in my business profile we created earlier.
- Claude loads business_profile.md and adds the footer.
You can even ask Claude what you should do next. It probably has a good idea. Try something like:
I'm building a business profile and plan for selling my new 3D printed dog characters. What should we do? Give me what you need.
Claude comes back with clarifying questions before it starts:
- What stage are you at with the product? → Concept only
- What's the sales model you're targeting? → Etsy / marketplace, Own website, Local / craft fairs, Wholesale / resellers
- What do you actually need right now? → Full business plan doc
A few more:
- What kind of dog characters are these? → Breed-specific figurines
- What's your startup budget range? → Under $1K
Claude gets to work.
I now have a business plan for a 3D Printed Breed-Specific Dog Figurines company.
The mental model that works for non-programmers: think of yourself as the product manager, not the engineer. You know what you want the end result to look like. You do not necessarily know how to build it. You review the output against your vision and give feedback. Claude is the engineer. Your job is to be clear about outcomes.
The mistake beginners make is describing what they think the code should do instead of what they want to accomplish. "Write a function that loops through files and checks if they end in .jpg" is implementation. "Move all the JPG files in this folder into a subfolder called images" is an outcome. Start with outcomes. Claude handles implementation.
The thing that actually changes once this is set up isn't that Claude becomes smarter - it doesn't. It's that the overhead of every interaction drops to zero. You're not re-explaining your context, your preferences, or your project. Instead, you're just working. For someone who isn't a developer (and even for those who are), this is the difference between Claude as a chatbot you visit and Claude as a personal assistant that lives in your workflow.
The setup takes probably about an hour, but the payoff compounds every session after.
1. Some of the switches may be different, or other esoteric commands or functionality may diverge, but for 99% of what you'll do things will be the same. ↩︎
2. There's lots of stuff you can do in a code repository like /init in there, or even have a README.md file to analyze the repo. I'm not going to cover any of these things, and you might even get mad at how I organize stuff or recommend things. This article is not for you. ↩︎
3. WSL2 technically runs on a lightweight Hyper-V virtual machine - but it's managed entirely by Windows and behaves nothing like a traditional VM you'd spin up manually. File access, networking, and process integration all happen transparently. The "not a VM" framing holds from a user experience standpoint. ↩︎
4. The version number in this URL changes as nvm releases updates. Before running, check github.com/nvm-sh/nvm for the latest release and substitute it in the URL. ↩︎
5. If you want something faster and don't need per-repo scoping, classic tokens are quicker: choose Tokens (classic) instead, click Generate new token (classic), check the repo scope, and you're done. The tradeoff is the token gets access to all your repositories, not just this one. ↩︎